FAQS
General Style
How to Change Font Style ?
Step 1:
Go To _fonts.scss (assets/scss/custom/fonts/_fonts.scss )
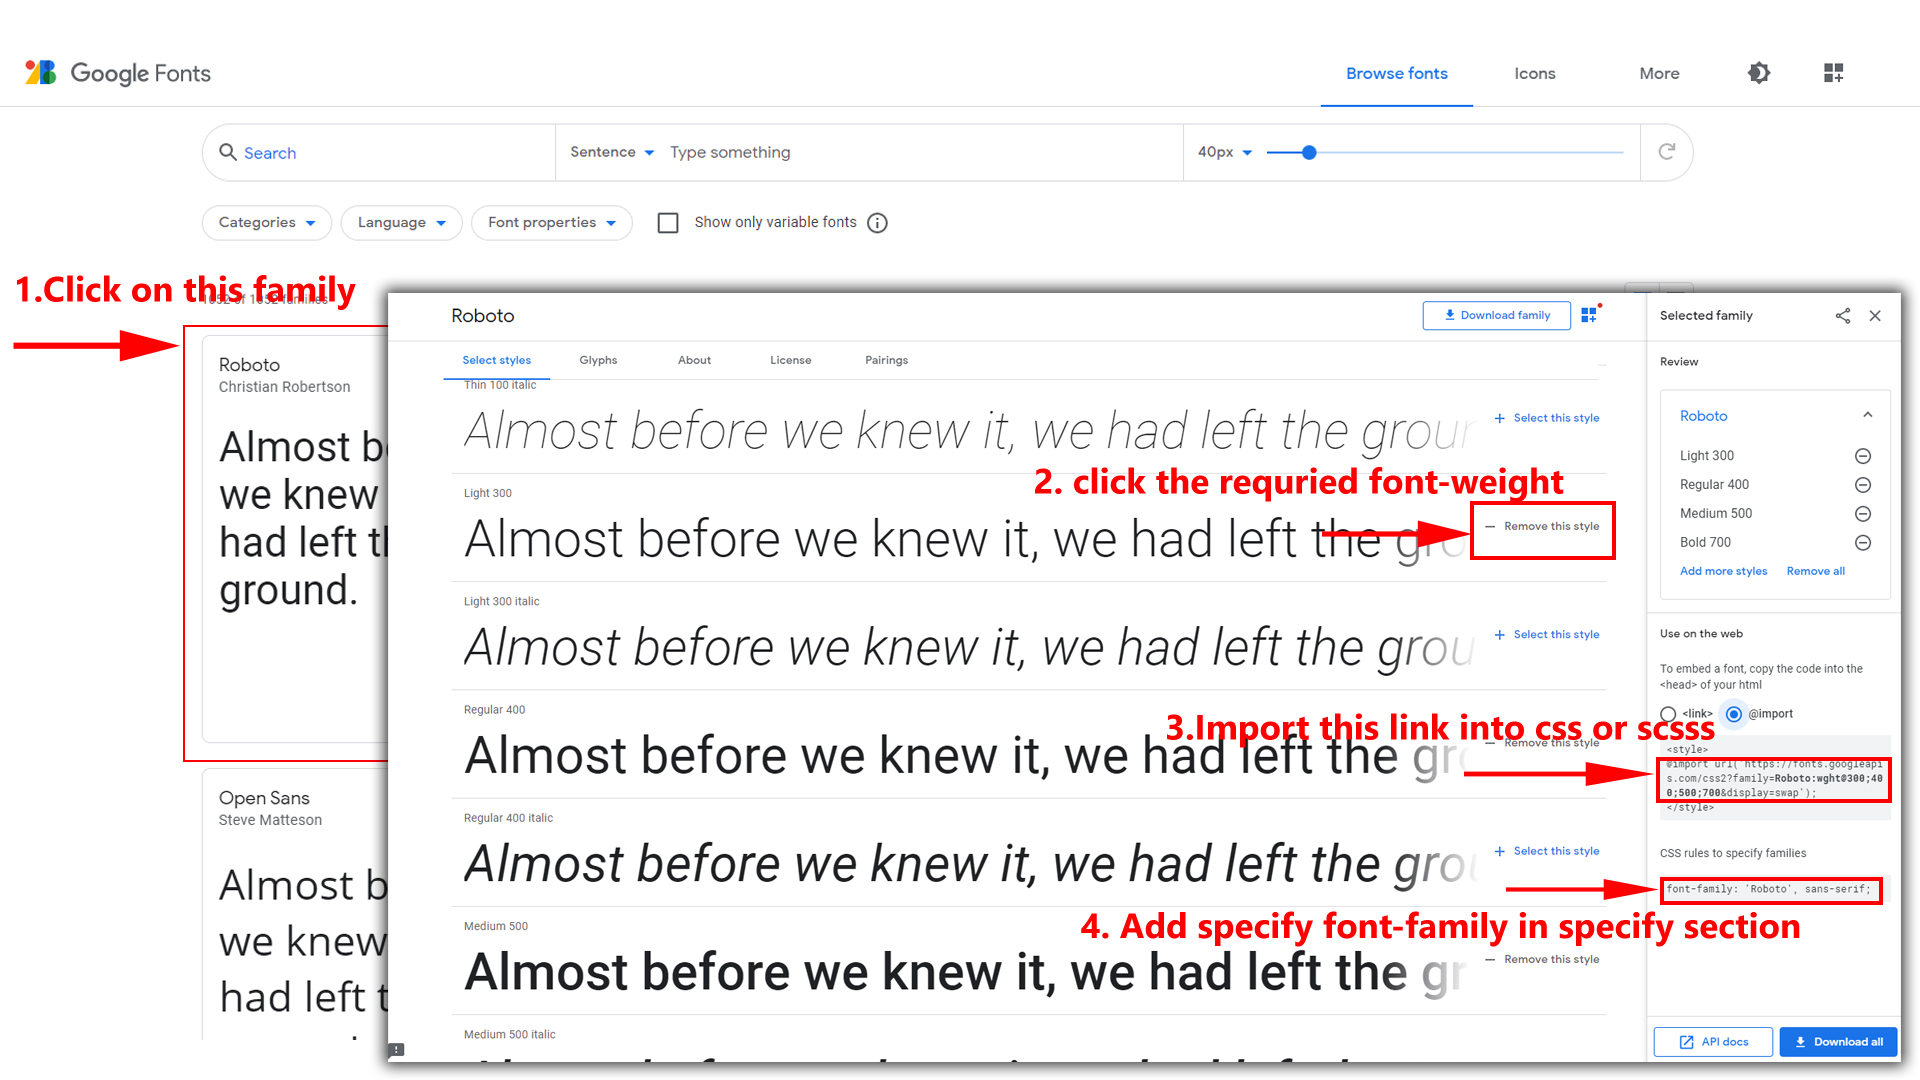
if you want to change another font-family Go to the site Google Fonts And Select One font Family and import In to style.css file
How to Select font Family
Example:
Step 2:
And paste Your Selected font-family in _fonts.scss
Example:
@import url("https://fonts.googleapis.com/css?family=Roboto:300,400,500,700,900");
Step 3:
And add the Your Selected font-family in _bootstrap-styles.scss(assets/scss/bootstrap/_bootstrap-styles.scss)
Example:
	body {
		margin: 0;
		padding: 0 !important;
		font-size: 14px;
		font-weight: 400;
		line-height: 1.5;
		color: $color;
		text-align: left;
		background-color: $background;
		font-family: 'Roboto', sans-serif;
	}
Note : After Changing font you must run gulp command i.e, gulp watch . Refer gulp page for more gulp commands click here.
How to Change Logo ?
Go To "assets/images/brand" folder and replace your logo with Previous Logos within in image size.
Note: Please don't increase logo sizes. Replace your logo within given image size. otherwise the logo will not fit in particular place it disturbs the template design.
How to Enable RTL Version
How to Enable RTL Version?
Please follow the bellow steps to enable RTL Version
Step 1 :
To enable RTL Version you have to open custom-switcher.js (assets/js/custom-switcher.js) file and remove comments for rtl as shown in below
									// RTL version Start //
									// $('body').addClass('rtl');
									// RTL version End //
Step 2 :
Remove the comments to enablertl as shown below
									// RTL version Start //
									   $('body').addClass('rtl');
									// RTL version End //
Theme Styles
How to Enable Dark Theme?
Please follow the bellow steps to enable Dark Theme
Step 1 :
To enable Dark Theme you have to open custom-switcher.js (assets/js/custom-switcher.js) file and remove comments for dark-theme as shown in below
									// Dark Theme Start //
									// $('body').addClass('dark-mode');
									// Dark Theme End //
Step 2 :
Remove the comments to enabledark-mode as shown below
									// Dark Theme Start //
									   $('body').addClass('dark-mode');
									// Dark Theme End //
How to Enable Light Theme?
Please follow the bellow steps to enable Light Theme
Step 1 :
To enable Light Theme you have to open custom-switcher.js(assets/js/custom-switcher.js) file and remove comments for light-theme as shown in below
									// Light Theme Start //
									// $('body').addClass('light-mode');
									// Light Theme End //
Step 2 :
Remove the comments to enablelight-mode as shown below
									// Light Theme Start //
									   $('body').addClass('light-mode');
									// Light Theme End //
How to Enable Transparent Theme?
Please follow the bellow steps to enable Transparent Theme
Step 1 :
To enable Transparent Theme you have to open custom-switcher.js(assets/js/custom-switcher.js) file and remove comments for transparent-theme as shown in below
									// Transparent Theme Start //
									// $('body').addClass('transparent-mode');
									// Transparent Theme End //
Step 2 :
Remove the comments to enablelight-mode as shown below
									// Transparent Theme Start //
									   $('body').addClass('transparent-mode');
									// Transparent Theme End //
How to enable switcher in any page ?
Switcher
Note:- The switcher.html and empty.html pages are displayed in pages in web in dashboard template.
How to Enable Styles for switcher?
Please Follow the below steps
Step1:
Open HTML file in Script Section change your custom-switcher.js to custom-switcher1.js style link in html style link in dashboard . check below Image
Before:

After:

To enable the switcher then you must have to place below HTML, CSS, JS in your html page.
Below HTML is in empty.html file